Local development
This Quick Start scenario assumes that you are installing the DFINITY Canister SDK for the first time and are running the Internet Computer as part of your local development environment.
To get started, let’s build and deploy a simple Hello application that has just one function—called greet. The greet function accepts one text argument and returns the result with a greeting similar to Hello, everyone! in a terminal if you run the application using the command-line or in an HTML page if you access the application in a browser.
Before you begin
Before you download and install this release of the DFINITY Canister SDK, verify the following:
-
You have an internet connection and access to a shell terminal on your local macOS or Linux computer.
Currently, the DFINITY Canister SDK only runs on computers with a macOS or Linux operating system.
-
You have
node.jsinstalled if you want to include the default template files for front-end development in your project.
This tutorial assumes you know how to perform common tasks—like opening a terminal and running commands—on your computer.
If you aren’t sure how to open a new terminal shell on your local computer or how to install node.js, see Preliminary steps for newcomers.
If you are comfortable meeting the prerequisites without instructions, continue to Download and install.
Download and install
You can download the latest version of the DFINITY Canister Software Development Kit (SDK) directly from within a terminal shell on your local computer.
To download and install:
-
Open a terminal shell on your local computer.
For example, open Applications, Utilities, then double-click Terminal or press ⌘+spacebar to open Search, then type
terminal. -
Download and install the DFINITY Canister SDK package by running the following command:
sh -ci "$(curl -fsSL https://sdk.dfinity.org/install.sh)"This command prompts you to read and accept the license agreement before installing the DFINITY execution command-line interface (CLI) and its dependencies on your local computer.
-
Type
yand press Return to continue with the installation.The command displays information about the components being installed on the local computer.
Verify the SDK is ready to use
If the installation script runs without any errors, everything you need to start developing programs that run on the Internet Computer blockchain will be available on your local computer.
To verify the SDK is ready to use:
-
Open a terminal shell on your local computer, if you don’t already have one open.
-
Check that you have the DFINITY execution command-line interface (CLI) installed and the
dfxexecutable is available in your PATH by running the following command:dfx --versionThe command displays version information for the
dfxcommand-line executable similar to the following:dfx 0.7.2
-
Preview usage information for the other
dfxcommand-line sub-commands by running the following command:dfx --helpThe command displays usage information for the
dfxparent command and its subcommands.
Create a new project
Applications for the Internet Computer start as projects.
You create projects using the dfx parent command and its subcommands.
For this tutorial, we’ll start with the default sample application to illustrate creating an application using the starter files in a project.
When you create a new project, the dfx command-line interface adds a default project directory structure to your workspace. We cover the template files that make up a project directory in the Explore the default project tutorial.
To create a new project for your first application:
-
Open a terminal shell on your local computer, if you don’t already have one open.
-
Create a new project named
helloby running the following command:dfx new helloThe
dfx new hellocommand creates a newhelloproject directory, template files, and a newhelloGit repository for your project.If you use a different project name instead of
hello, make note of the name you used. You’ll need to use that project name in place of thehelloproject name throughout these instructions. -
Change to your project directory by running the following command:
cd hello
Start the local network
Before you can build your first project, you need to connect to the Internet Computer network either running locally in your development environment or running remotely on a subnet that you can access.
These instructions assume you are running the Internet Computer locally. If you are connecting to an external Internet Computer network, you can skip this section.
As a best practice, this step requires you to have two terminal shells open, so that you can start and see network operations in one terminal and manage your project in another.
To start the network locally:
-
Open a new second terminal window or tab on your local computer.
-
Navigate to the root directory for your project, if necessary.
You should now have two terminals open with your project directory as your current working directory in both terminals.
-
Start the Internet Computer network on your local computer in your second terminal by running the following command:
dfx startDepending on your platform and local security settings, you might see a warning displayed. If you are prompted to allow or deny incoming network connections, click Allow.
-
Leave the terminal window that displays network operations open and switch your focus to the first terminal window where you created your new project.
You perform the remaining steps in the terminal that doesn’t display network operations.
Register, build, and deploy the application
After you connect to the Internet Computer network running locally in your development environment, you can register, build, and deploy your application locally.
To deploy your first application locally:
-
Check that you are still in the root directory for your project, if needed.
-
Ensure that
nodemodules are available in your project directory, if needed, by running the following command:npm installFor more information about this step, see Ensuring node is available in a project.
-
Register, build, and deploy your first application by running the following command:
dfx deployThe
dfx deploycommand output displays information about the operations it performs. For example, this step registers two network-specific identifiers—one for thehellomain program and one for thehello_assetsfront-end user interface—and installation information similar to the following:Creating the "default" identity. - generating new key at /Users/pubs/.config/dfx/identity/default/identity.pem Created the "default" identity. Creating a wallet canister on the local network. The wallet canister on the "local" network for user "pubs_user_id" is "rwlgt-iiaaa-aaaaa-aaaaa-cai" Deploying all canisters. Creating canisters... Creating canister "hello"... "hello" canister created with canister id: "rrkah-fqaaa-aaaaa-aaaaq-cai" Creating canister "hello_assets"... "hello_assets" canister created with canister id: "ryjl3-tyaaa-aaaaa-aaaba-cai" Building canisters... Building frontend... Installing canisters... Creating UI canister on the local network. The UI canister on the "local" network is "r7inp-6aaaa-aaaaa-aaabq-cai" Installing code for canister hello, with canister_id rrkah-fqaaa-aaaaa-aaaaq-cai Installing code for canister hello_assets, with canister_id ryjl3-tyaaa-aaaaa-aaaba-cai Authorizing our identity (pubs_user_id) to the asset canister... Uploading assets to asset canister... /index.html 1/1 (472 bytes) /index.html (gzip) 1/1 (314 bytes) /index.js 1/1 (260229 bytes) /index.js (gzip) 1/1 (87771 bytes) /main.css 1/1 (484 bytes) /main.css (gzip) 1/1 (263 bytes) /sample-asset.txt 1/1 (24 bytes) /logo.png 1/1 (25397 bytes) /index.js.map 1/1 (842559 bytes) /index.js.map (gzip) 1/1 (228432 bytes) /index.js.LICENSE.txt 1/1 (499 bytes) /index.js.LICENSE.txt (gzip) 1/1 (285 bytes) Deployed canisters.
If you created a project with a different name, however, your canister names will match your project name instead of
helloandhello_assets.You should also note that the first time you deploy,
dfxcreates adefaultidentity and a local cycle wallet controlled by yourdefaultidentity. A cycles wallet is a special type of canister that enables you to transfer cycles to other canisters.To deploy this sample application locally, you don’t need to know anything about your default developer identity, using a cycles wallet, or managing cycles. We’ll cover these topics later, but for now, just note that these are created for you automatically.
-
Call the
hellocanister and the predefinedgreetfunction by running the following command:dfx canister call hello greet everyoneLet’s take a closer look at this example command:
-
The
dfx canister callcommand requires you to specify a canister name and a method—or function—to call. -
hellospecifies the name of the canister you want to call. -
greetspecifies the name of the function you want to call in thehellocanister. -
everyoneis the text data type argument that you want to pass to thegreetfunction.
Remember, however, that if you created a project with a different name, the canister name will match your project name and you’ll need to modify the command line to match the name you used instead of
hello. -
-
Verify the command displays the return value of the
greetfunction.For example:
("Hello, everyone!")
Test the application front-end
Now that you have verified that your application has been deployed and tested its operation using the command line, let’s verify that you can access the front-end using your web browser.
-
Open a browser.
-
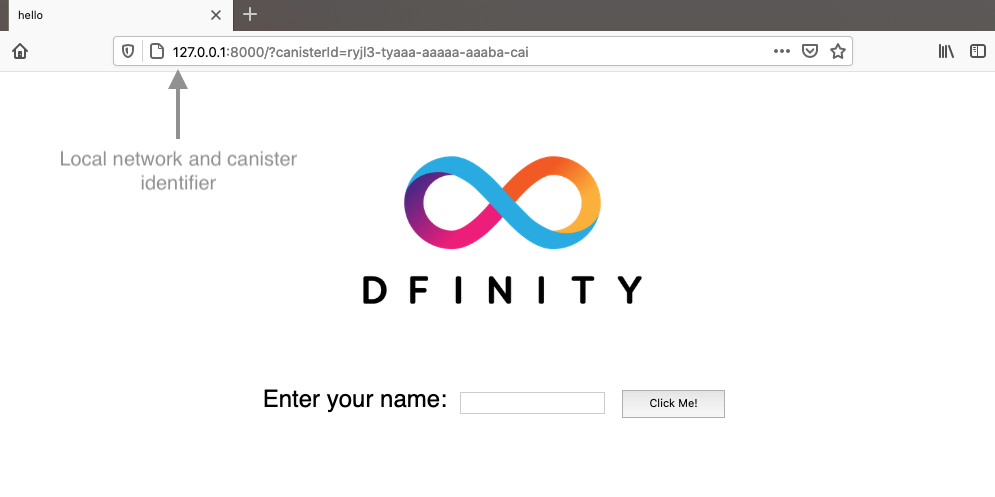
Navigate to the default address and port number
127.0.0.1:8000. -
Append
/?canisterId=and thehello_assetsidentifier to the URL.If you didn’t make a note of the canister identifier, you can look it up by running the following command:
dfx canister id hello_assetsAdd the canister identifier returned to the URL using the following syntax:
?canisterId=<YOUR-ASSET-CANISTER-IDENTIFIER>
+ For example, the full URL should look similar to the following:
+
http://127.0.0.1:8000/?canisterId=ryjl3-tyaaa-aaaaa-aaaba-cai
+ Navigating to this URL displays a simple HTML page with a sample asset image file, an input field, and a button. For example:
+
-
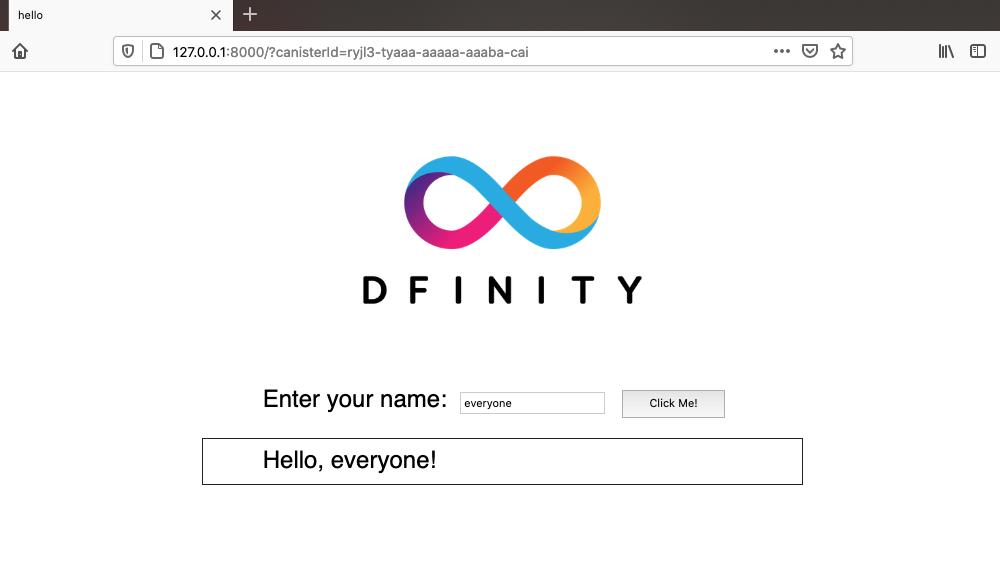
Type a greeting, then click Click Me to return the greeting.
For example:
Stop the local network
After testing the application in the browser, you can stop the local Internet Computer network so that it doesn’t continue running in the background.
To stop the local network:
-
In the terminal that displays network operations, press Control-C to interrupt the local network process.
-
Stop the local Internet Computer network running on your local computer by running the following command:
dfx stop
Next steps
This Quick Start touched on only a few key steps to introduce the basic workflow for developing programs of your own. You can find more detailed examples and tutorials to help you learn about how to use Motoko and how to develop applications to run on the Internet Computer throughout the documentation.
Here are some suggestions for where to go next:
-
Tutorials to explore building simple applications using a local development environment.
-
Convert ICP tokens to cycles if you have ICP tokens that you want to convert to cycles to enable you to deploy applications to the Internet Computer network.
-
Network deployment if you have cycles and are ready to deploy an application to the Internet Computer network.
-
What is Candid? to learn how the Candid interface description language enables service interoperability and composability.
-
Motoko at-a-glance to learn about the features and syntax for using Motoko.