Pass text arguments
This tutorial provides a simple variation on the default program that lets you pass a single text argument to a single actor, compile the code to create a canister, then retrieve the argument.
This tutorial illustrates how to pass arguments on the command-line in a terminal using the Candid interface description language (IDL) and how to modify the program to allow it to accept more than one value for the text argument.
Before you begin
Before you start this tutorial, verify the following:
-
You have downloaded and installed the DFINITY Canister SDK package as described in Download and install.
-
You have stopped any Internet Computer network processes running on the local computer.
This tutorial takes approximately 20 minutes to complete.
Create a new project
To create a new project for this tutorial:
-
Open a terminal shell on your local computer, if you don’t already have one open.
-
Change to the folder you are using for your Internet Computer projects, if you are using one.
-
Create a new project by running the following command:
dfx new location_hello -
Change to your project directory by running the following command:
cd location_hello
Modify the default configuration
In the Explore the default project tutorial, you saw that creating a new project adds a default dfx.json configuration file to your project directory.
You should always review the default settings in the file to verify the information accurately reflects the project settings you want to use.
For this tutorial, you’ll modify the default configuration to remove settings that aren’t used.
To modify settings in the dfx.json configuration file:
-
Open the
dfx.jsonconfiguration file in a text editor. -
Check the default settings for the
location_helloproject. -
Remove all of the unnecessary configuration settings.
Because this tutorial does not involve creating any front-end assets, you can remove all of the
location_hello_assetsconfiguration settings from the file. -
Save your changes and close the file to continue.
Modify the default program
In the Explore the default project tutorial, you saw that creating a new project creates a default src directory with a template main.mo file.
To modify the default template source code:
-
Open the
src/location_hello/main.mosource code file in a text editor. -
Modify the default source code to replace the
greetfunction with alocationfunction and thenameargument with acityargument.For example:
actor { public func location(city : Text) : async Text { return "Hello, " # city # "!"; }; }; -
Save your changes and close the file to continue.
Start the local network
Before you can build your project, you need to connect to the Internet Computer network either running locally in your development environment or running remotely on a subnet that you can access.
Starting the network locally requires a dfx.json file, so you should be sure you are in your project’s root directory.
For this tutorial, you should have two separate terminal shells, so that you can start and see network operations in one terminal and manage your project in another.
To start the local network:
-
Open a new terminal window or tab on your local computer.
-
Navigate to the root directory for your project, if necessary.
-
You should now have two terminals open.
-
You should have the project directory as your current working directory.
-
-
Start the Internet Computer network on your local computer by running the following command:
dfx startIf you are prompted to allow or deny incoming network connections, click Allow.
-
Leave the terminal that displays network operations open and switch your focus to your original terminal where you created your project.
Register, build, and deploy the application
After you connect to the Internet Computer network running locally in your development environment, you can register, build, and deploy your application locally.
To deploy the application locally:
-
Check that you are still in the root directory for your project, if needed.
-
Register, build, and deploy your application by running the following command:
dfx deployThe
dfx deploycommand output displays information about the operations it performs.
Pass a text argument
You now have a program deployed as a canister on your local Internet Computer network and can test your program by using dfx canister call commands.
To test the program you have deployed locally:
-
Call the
locationmethod in the program and pass yourcityargument of typetextby running the following command:dfx canister call location_hello location "San Francisco"Because the argument in this case includes a space between
SanandFrancisco, you need to enclose the argument in quotes. The command displays output similar to the following:("Hello, San Francisco!")If the argument did not contain a space that required enclosing the text inside of quotation marks, you could allow the Candid interface description language to infer the data type like this:
dfx canister call location_hello location ParisCandid infers the data type as
Textand returns the output from your program as text like this:("Hello, Paris!") -
Call the
locationmethod in the program and pass yourcityargument explicitly using the Candid interface description language syntax for Text arguments:dfx canister call location_hello location '("San Francisco and Paris")'The command displays output similar to the following:
("Hello, San Francisco and Paris!")Because your program only accepts a single text argument, specifying multiple strings returns only the first argument.
For example, if you try this command:
dfx canister call location_hello location '("San Francisco","Paris","Rome")'Only the first argument—
("Hello, San Francisco!")—is returned.
Revise the source code in your program
To extend what you have learned in this tutorial, you might want to try modifying the source code to return different results.
For example, you might want to modify the location function to return multiple city names.
To experiment with modifying the source code for this tutorial:
-
Open the
dfx.jsonconfiguration file in a text editor and change the defaultlocation_hellosettings tofavorite_cities.For this step, you should modify both the canister name and the path to the main program for the canister to use
favorite_cities. -
Save your changes and close the
dfx.jsonfile to continue. -
Copy the
location_hellosource file directory to match the name specified in thedfx.jsonconfiguration file by running the following command:cp -r src/location_hello src/favorite_cities -
Open the
src/favorite_cities/main.mofile in a text editor. -
Copy and paste the following code sample to replace the
locationfunction with two new functions.For example:
actor {

  public func location(cities : [Text]) : async Text {
    return "Hello, from " # (debug_show cities) # "!";
  };

  public func location_pretty(cities : [Text]) : async Text {
    var str = "Hello from ";
    for (city in cities.vals()) {
      str := str # city #", ";
    };
    return str # "bon voyage!";
  }
};
You might notice that
Textin this code example is enclosed by square ([ ]) brackets. By itself,Textrepresents a collection of UTF-8 characters. The square brackets around a type indicate that it is an array of that type. In this context, therefore,[Text]indicates an array of a collection of UTF-8 characters, enabling the program to accept and return multiple text strings.The code sample also uses the basic format of an
applyoperation for the array, which can be abstracted as:public func apply<A, B>(fs : [A -> B], xs : [A]) : [B] { var ys : [B] = []; for (f in fs.vals()) { ys := append<B>(ys, map<A, B>(f, xs)); }; ys; }; -
Register, build, and deploy the application by running the following command:
dfx deploy -
Call the
locationmethod in the program and pass yourcityargument using the Candid interface description syntax by running the following command:dfx canister call favorite_cities location '(vec {"San Francisco";"Paris";"Rome"})'The command uses the Candid interface description syntax
(vec { val1; val2; val3; })to return a vector of values. For more information about the Candid interface description language, see the Candid language guide.This command displays output similar to the following:
("Hello, from ["San Francisco", "Paris", "Rome"]!") -
Call the
location_prettymethod in the program and pass yourcityargument using the interface description syntax by running the following command:dfx canister call favorite_cities location_pretty '(vec {"San Francisco";"Paris";"Rome"})'The command displays output similar to the following:
("Hello from San Francisco, Paris, Rome, bon voyage!")
Test functions in a browser
The canister interface description language—often referred to as Candid or more generally as the IDL—provides a common language for specifying the signature of a canister service.
Candid provides a unified way for you to interact with canisters that are written in different languages or accessed using different tools.
For example, Candid provides a consistent view of a service whether the underlying program is native Rust, JavaScript, or Motoko.
Candid also enables different tools—such as the dfx command-line interface and the Network Nervous System application—to share a common description for a service.
Based on the type signature of the actor, Candid also provides a web interface that allows you to call canister functions for testing and debugging.
After you have deployed your project locally using the dfx deploy or dfx canister install command, you can access the Candid web interface endpoint in a browser.
This web interface—the Candid UI—exposes the service description in a form, enabling you to quickly view and test functions and experiment with entering different data types without writing any front-end code.
To use the Candid web interface to test canister functions:
-
Find the Candid UI canister identifier associated with the current project using the
dfx canister id __Candid_UIcommand.dfx canister id __Candid_UIThe command displays the canister identifier for the Candid UI with output similar to the following:
r7inp-6aaaa-aaaaa-aaabq-cai
-
Copy the Candid UI canister identifier so that it is available in the clipboard.
-
If you’ve stopped the Internet Computer, restart it locally by running the following command:
dfx start --background -
Open a browser and navigate to the address and port number specified in the
dfx.jsonconfiguration file.By default, the
localnetwork binds to the127.0.0.1:8000address and port number. -
Add the required
canisterIdparameter and the Candid UI canister identifier returned by thedfx canister idcommand to the URL.For example, the full URL should look similar to the following but with the
CANDID-UI-CANISTER-IDENTIFIERthat was returned by thedfx canister idcommand:http://127.0.0.1:8000/?canisterId=<CANDID-UI-CANISTER-IDENTIFIER>
The browser displays a form for you to specify a canister identifier or choose a Candid description (
.did) file.If you aren’t sure which canister identifier to use, you can run the
dfx canister idcommand to look up the identifier for a specific canister name. -
Specify the canister identifier or description file for your application into the Provide a canister ID field, then click Go to display the service description.
-
Review the list of function calls and types defined in the program.
-
Type a value of the appropriate type for a function or click Random to generate a value, then click Call or Query to see the result.
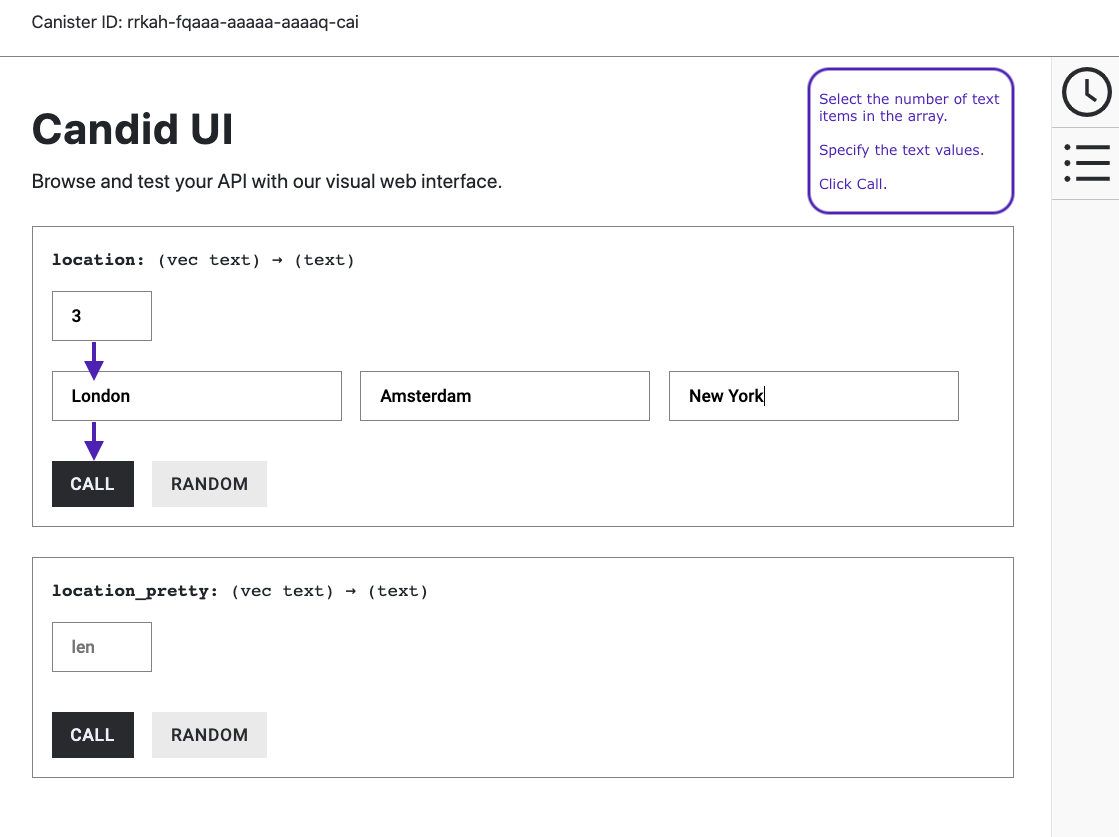
Note that depending on the data type, the Candid interface might display additional configuration settings for testing functions. For example, if a function takes an array, you might need to specify the number of items in the array before entering values.
In this example, each function accepts an array of text strings. Therefore, you first select the length of the array, then set values for each item before clicking Call.
Stop the local network
After you finish experimenting with your program, you can stop the local Internet Computer network so that it doesn’t continue running in the background.
To stop the local network:
-
In the terminal that displays network operations, press Control-C to interrupt the local network process.
-
Stop the Internet Computer network by running the following command:
dfx stop