Customize the front-end
Now that you have a basic understanding of how to create, build, and deploy a simple program and are familiar with the default project files and sample front-end, you might want to start experimenting with different ways to customize the front-end user experience for your project.
This tutorial illustrates using a simple React framework to create a new front-end for the default sample program and guides you through some basic modifications to customize the interface displayed. Later tutorials expand on the techniques introduced here, but if you already know how to use CSS, HTML, JavaScript, and React or other frameworks to build your user interface, you can skip this tutorial.
| This tutorial illustrates using the React framework to manage the Document Object Model (DOM) for your canister. Because React has its own custom DOM syntax, you need to modify the webpack configuration to compile the front-end code, which is written in JSX. For more information about learning to use React and JSX, see Getting started on the React website. |
Before you begin
Before starting the tutorial, verify the following:
-
You have
node.jsinstalled for front-end development and can install packages usingnpm installin your project. For information about installing node for your local operating system and package manager, see the Node website. -
You have downloaded and installed the DFINITY Canister SDK package as described in Download and install.
-
You have installed the Visual Studio Code plugin for Motoko as described in Install the language editor plug-in if you are using Visual Studio Code as your IDE.
-
You have stopped any Internet Computer network processes running on the local computer.
Because of significant changes to the handling of HTTP requests and front-end assets, this tutorial requires you to use the DFINITY Canister SDK version 0.7.0 or later. For an overview of what’s changed, see this article.
|
This tutorial takes approximately 30 minutes to complete.
Create a new project
To create a new project directory for your custom front-end application:
-
Open a terminal shell on your local computer, if you don’t already have one open.
-
Change to the folder you are using for your Internet Computer projects, if you are using one.
-
Check that you have
node.jsinstalled locally by running the following commands:which node which npmIf you don’t have
node.jsinstalled, you should download and install it before continuing to the next step. For information about installing node for your local operating system and package manager, see the Node website. -
Create a new project by running the following command:
dfx new custom_greetingThe
dfx new custom_greetingcommand creates a newcustom_greetingproject. -
Change to your project directory by running the following command:
cd custom_greeting
Install the React framework
If you’ve never used React before, you might want to explore the Intro to React tutorial or the React website before editing the front-end code.
To install required framework modules:
-
Install the React module by running the following command:
npm install --save react react-dom -
Install the required TypeScript language compiler loader by running the following command:
npm install --save typescript ts-loaderAs an alternative to installing these modules, you can edit the default package.jsonfile to add dependencies for your project.{ "name": "custom_greeting_assets", "version": "0.1.0", "description": "", "keywords": [], "scripts": { "build": "webpack" }, "devDependencies": { "@dfinity/agent": "0.7.2", "assert": "2.0.0", "buffer": "6.0.3", "events": "3.3.0", "html-webpack-plugin": "5.3.1", "process": "0.11.10", "stream-browserify": "3.0.0", "terser-webpack-plugin": "5.1.1", "util": "0.12.3", "webpack": "5.24.4", "webpack-cli": "4.5.0" }, "dependencies": { "react": "^17.0.2", "react-dom": "^17.0.2", "ts-loader": "^8.1.0", "typescript": "^4.2.4" } }
Review the default configuration
Before we make any changes to use React for this tutorial, let’s review the default front-end settings in the dfx.json configuration file for your project.
To review the default dfx.json configuration file:
-
Open the
dfx.jsonconfiguration file in a text editor. -
Notice that the
canisterskey includes settings for acustom_greeting_assetscanister.{ "canisters": { ... "custom_greeting_assets": { "dependencies": [ "custom_greeting" ], "frontend": { "entrypoint": "src/custom_greeting_assets/src/index.html" }, "source": [ "src/custom_greeting_assets/assets", "dist/custom_greeting_assets/" ], "type": "assets" } } }Let’s take a look at the settings in this section.
-
Front-end assets for your project are compiled into their own canister, in this case, a canister named
custom_greeting_assets. -
The assets canister has a default dependency on the main canister for the project.
-
The
frontend.entrypointsetting specifies the path to a file—in this case, theindex.htmlfile—to use as your application entry point. If you had a different starting point—for example, a customfirst-page.htmlfile—you would modify this setting. -
The
sourcesettings specify the path to yoursrcanddistdirectories. Thesrcsetting specifies the directory to use for static assets that will be included in your assets canister when you build your project. If you have custom cascading stylesheet (CSS) or JavaScript files, you would include them in the folder specified by this path. After building the project, the project assets are served from the directory specified by thedistsetting. -
The
typesetting specifies that thecustom_greeting_assetsis an asset canister rather than a program canister.
For this tutorial, we are going to add React JavaScript in an
index.jsxfile, but that won’t require any changes to the default settings in thedfx.jsonfile. -
-
Close the
dfx.jsonfile to continue.
Review the default front-end files
For this tutorial, you are going to use the default main.mo program and only manipulate the application by modifying the front-end.
Before you make any changes, though, let’s take a look at what’s in the default front-end files for a project.
To review the default front-end files:
-
Open the
src/custom_greeting_assets/src/index.htmlfile in a text editor.This template file is the default front-end entry point for the application as specified by the
frontend.entrypointsetting in thedfx.jsonfile.This file contains standard HTML with references to a CSS file and an image that are located in the
src/custom_greeting_assets/assetsdirectory. The defaultindex.htmlfile also includes standard HTML syntax for displaying an input field for thenameargument and a clickable button.This is the same default front-end you saw in Viewing the default front-end.
-
Open the
src/custom_greeting_assets/src/index.jsfile in a text editor.import { Actor, HttpAgent } from '@dfinity/agent'; import { idlFactory as custom_greeting_idl, canisterId as custom_greeting_id } from 'dfx-generated/custom_greeting'; const agent = new HttpAgent(); const custom_greeting = Actor.createActor(custom_greeting_idl, { agent, canisterId: custom_greeting_id }); document.getElementById("clickMeBtn").addEventListener("click", async () => { const name = document.getElementById("name").value.toString(); const greeting = await custom_greeting.greet(name); document.getElementById("greeting").innerText = greeting; });-
The first
importstatement in the defaultindex.jsfile creates an actor and an agent instance using the JavaScript agent library. -
The second
importstatement prepares thecustom_greetingcanister for the actor object to be constructed. -
The next two statements construct the agent and actor objects.
-
The remaining lines provide the document object handling for the default application.
-
-
Close the
index.jsfile to continue.
Modify the front-end files
You are now ready to create a new front-end for the default program.
To prepare the front-end files:
-
Open the webpack configuration file (
webpack.config.js) in a text editor. -
Modify the front-end entry to replace the default
index.htmlwithindex.jsx.entry: { // The frontend.entrypoint points to the HTML file for this build, so we need // to replace the extension to `.js`. index: path.join(__dirname, info.frontend.entrypoint).replace(/\.html$/, ".jsx"), }, -
Add the following
modulekey above thepluginssection:module: { rules: [ { test: /\.(js|ts)x?$/, loader: "ts-loader" } ] },This setting enables the program to use the
ts-loadercompiler for a React JavaScriptindex.jsxfile. Note that there’s a commented section in the defaultwebpack.config.jsfile that you can modify to add themodulekey. -
Create a new file named
tsconfig.jsonin the root directory for your project. -
Open the
tsconfig.jsonfile in a text editor, then copy and paste the following into the file:{ "compilerOptions": { "target": "es2018", /* Specify ECMAScript target version: 'ES3' (default), 'ES5', 'ES2015', 'ES2016', 'ES2017', 'ES2018', 'ES2019' or 'ESNEXT'. */ "lib": ["ES2018", "DOM"], /* Specify library files to be included in the compilation. */ "allowJs": true, /* Allow javascript files to be compiled. */ "jsx": "react", /* Specify JSX code generation: 'preserve', 'react-native', or 'react'. */ }, "include": ["src/**/*"], } -
Save your changes and close the
tsconfig.jsonfile to continue. -
Open the default
src/custom_greeting_assets/src/index.jsfile in a text editor and delete lines 7 to 12. -
Copy and paste the following sample code into the
index.jsfile:// Insert these lines after the import statements for // importing an agent and an actor import * as React from 'react'; import { render } from 'react-dom'; // Replace the default index.js content with // React JavaScript class MyHello extends React.Component { constructor(props) { super(props); this.state = { name: 'Name', message: '', }; } async doGreet() { const greeting = await custom_greeting.greet(this.state.name); this.setState({ ...this.state, message: greeting }); } onNameChange(ev) { this.setState({ ...this.state, name: ev.target.value }); } render() { return ( <div style={{ "font-size": "30px" }}> <div style={{ "background-color": "yellow" }}> <p>Greetings, from DFINITY!</p> <p> Type your message in the Name input field, then click <b> Get Greeting</b> to display the result.</p> </div> <div style={{ "margin": "30px" }}> <input id="name" value={this.state.name} onChange={ev => this.onNameChange(ev)}></input> <button onClick={() => this.doGreet()}>Get Greeting!</button> </div> <div>Greeting is: "<span style={{ "color": "blue" }}>{this.state.message}</span>"</div> </div> ); } } render(<MyHello />, document.getElementById('app')); -
Rename the modified
index.jsfile asindex.jsxby running the following command:mv src/custom_greeting_assets/src/index.js src/custom_greeting_assets/src/index.jsx -
Open the default
src/custom_greeting_assets/src/index.htmlfile in a text editor, then replace the body contents with<div id="app"></div>.For example:
<!doctype html>
<html lang="en">
 <head>
    <meta charset="UTF-8">
    <meta name="viewport" content="width=device-width">
    <title>custom_greeting</title>
    <base href="/">
    <link type="text/css" rel="stylesheet" href="main.css" />
 </head>
 <body>
    <div id="app"></div>
 </body>
</html>
Start the local network
Before you can build the custom_greeting project, you need to connect to the Internet Computer network either running locally in your development environment or running remotely on a subnet that you can access.
To start the network locally:
-
Open a new terminal window or tab on your local computer.
-
Navigate to the root directory for your project, if necessary.
-
Start the Internet Computer network on your local computer by running the following command:
dfx start --backgroundAfter the local Internet Computer network completes its startup operations, you can continue to the next step.
Register, build, and deploy the application
After you connect to the Internet Computer network running locally in your development environment, you can register, build, and deploy your application locally.
To deploy the application locally:
-
Check that you are still in the root directory for your project, if needed.
-
Register, build, and deploy your application by running the following command:
dfx deployThe
dfx deploycommand output displays information about the operations it performs. -
Copy the canister identifier for the
custom_greeting_assetscanister to the clipboard or a notepad application.If you didn’t make a note of the canister identifier, you can look it up by running the following command:
dfx canister id custom_greeting_assets
View the new front-end
You can now access the new front-end for the default program by entering the canister identifier for the assets canister in a browser.
To view the custom front-end:
-
Open a browser and navigate to the
localnetwork address and port number specified in thedfx.jsonconfiguration file.For example, if you are using the default binding for the local network, navigate to
127.0.0.1:8000/.To specify the canister you want the web server to display, add the
canisterIdparameter and thecustom_greeting_assetscanister identifier to the URL using the following syntax:?canisterId=<YOUR-ASSET-CANISTER-IDENTIFIER>
For example, the full URL should look similar to the following but with the
_canister_identifier_that was returned for thecustom_greeting_assetscanister when you deployed the canister:http://127.0.0.1:8000/?canisterId=cxeji-wacaa-aaaaa-aaaaa-aaaaa-aaaaa-aaaaa-q
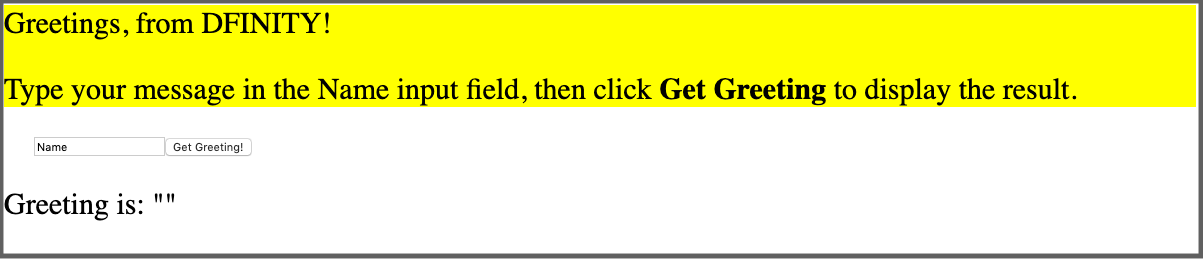
-
Verify that you are prompted to type a greeting.
For example:
-
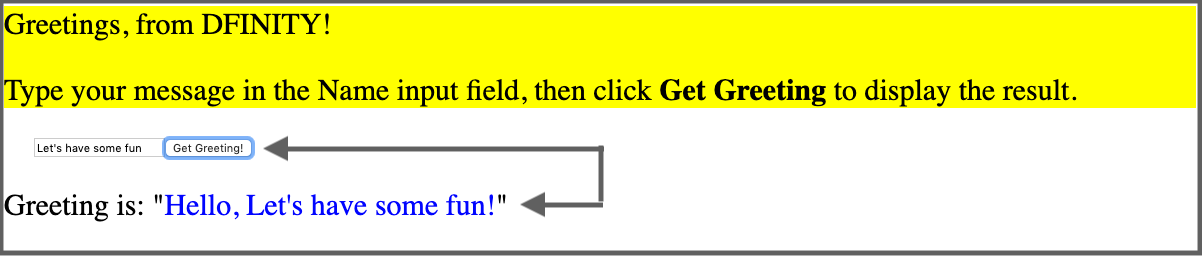
Replace Name in the input field with the text you want to display, then click Get Greeting to see the result.
For example:
Revise the front-end and test your changes
After viewing the front-end, you might want to make some changes.
To modify the front-end:
-
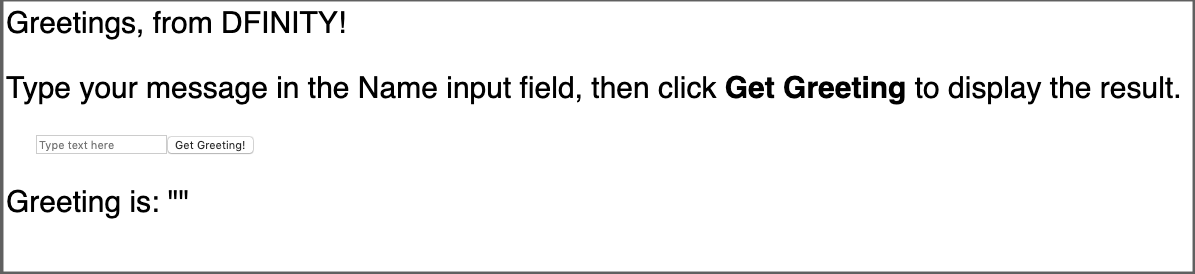
Open the
index.jsxfile in a text editor and modify its style settings. For example, you might want to change the font family and use a placeholder for the input field by making changes similar to the following:// Modify the front-end in the React JavaScript class MyHello extends React.Component { constructor(props) { super(props); this.state = { name: '', message: '', }; } async doGreet() { const greeting = await custom_greeting.greet(this.state.name); this.setState({ ...this.state, message: greeting }); } onNameChange(ev) { this.setState({ ...this.state, name: ev.target.value }); } render() { return ( <div style={{ "font-family": "sans-serif" }}> <div style={{ "font-size": "30px" }}> <p>Greetings, from DFINITY!</p> <p> Type your message in the Name input field, then click <b> Get Greeting</b> to display the result.</p> <div style={{ "margin": "30px" }}> <input id="name" placeholder="Type text here" value={this.state.name} onChange={ev => this.onNameChange(ev)}></input> <button onClick={() => this.doGreet()}>Get Greeting!</button> </div> <div>Greeting is: "<span style={{ "color": "green" }}>{this.state.message}</span>"</div> </div> </div> ); } } render(<MyHello />, document.getElementById('app')); -
Rebuild the project with your changes by running the following command.
dfx build -
Deploy your project changes by running the following command:
dfx canister install --all --mode reinstall -
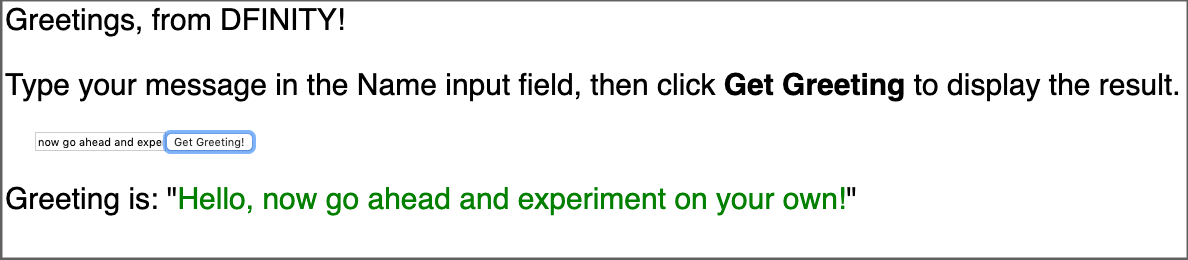
View the results in the browser by reloading the page that displays the
custom_greeting_assetscanister.For example:
-
Type a new message and see your new greeting. For example:
Stop the local network
After you finish experimenting with the front-end for your program, you can stop the local Internet Computer network so that it doesn’t continue running in the background.
To stop the local network:
-
In the terminal that displays network operations, press Control-C to interrupt the local network process.
-
Stop the Internet Computer network by running the following command:
dfx stop